Monthly Archives: January 2016

Vastly Clear Haiku

spiral-staircase-sculpture-kpmg-munich-olafur-eliasson-umschreibung

Endless Spiral Staircase in Munich. Photograph by Philipp Klinger. Sculpture design by Olafur Eliasson

True eternity
is not a destination
a continuum?

kat ~ 4 January 2016

I like to double-check my format when doing a RonovanWrites Haiku. Once I figured out the rules, it is hard for me to write a Haiku any other way. At any rate here are the checks…
-3 lines – 5/7/5 (Check)
-Sentence – Lines 1-2: True eternity is not a destination. (Check)
-Sentence – Lines 2-3: Is not a destination a continuum? and (CHECK!)…I really like the way that second sentence flipped into a question!  Sometimes I even surprise myself! 🙂

This week’s Ronovan Writes Weekly Haiku Poetry Prompt Challenge employs the words “Vast” and “Clear” (or in the case of this offering, thesaurus researched representations of the words in question: Vast – Eternity / Clear – True). If you would like to read other Haiku or enter your own interpretation, click HERE.


New Glasses

FullSizeRender 3
I love getting new glasses. I picked mine up the other day, assuring the clerk that I would be okay wearing them right out of the store, rather than easing into them as she suggested.

“Just pack up my old glasses. I’ll wear these home.” I said. With a raised eyebrow and an accommodating smile she packed up the old glasses and sent me on my way.

I would be fine. I had just read the friggin’ bottom line of smaller than fine print text on the “Try Out Your New Glasses” laminated card. These glasses were AWESOME!

What a rush it was the see the world for the first time, again, through a new set of specs. There were actually pebbles in the pavement…oh…hello there. It was a little closer than I remembered. I’ll get used to that. Watch your step Kat. The curb was taller too. Don’t look down. Just don’t look…down. Oooops. There’s the car. Needs a wash. I’ll have to get to that this weekend.

But oh…the sky and clouds! They looked so clear. And the trees. What leaves that were left…there were LEAVES on the trees. The street signs had words on them. And the yellow line was actually a yellow LINE not a smudge that I imagined an impressionistic public works worker painted on a binge.

Some would say, don’t drive until you are adjusted to your new glasses. But considering that I couldn’t see the signs or the road before, I think that’s a bit backwards.

I made it home. Did you have any doubt? Couldn’t wait to sit with a cup of tea, relax and read a book or the paper without squinting.

But my dream of utopia was quickly dashed.

Wow! look at the dust on the piano. And on the side tables…the mantle…the television screen…the peace lily plant…the cloth furniture. And the slingers! Slinger is code for slobber – a term used by the crazy owners of English Mastiffs who are masters at slinging slimy slobbers in the most interesting places…like there, on the framed photo of Aunt June…right there on the edge of her mouth…GAG! There’s a ring around the tub…and rust stains in the bowl. Bug remnants on the windows and goo on the countertops.

slinger

Master Slinger, Maxwell Robert, demonstrating his impressive looped slobber slinging skills. One shake of his head and…

After the initial shock, I regained my equilibrium, dug my old glasses out of my purse, and settled down with a cup of tea and that book. Don’t mind my squinting. I manage just fine squinting. Seeing is too much pressure!

kat ~ 4 January 2016


Banana Bread

As promised, one more recipe from my cooking spree this weekend! This is an easy recipe. I only go for easy peasy and delicious of course! And I HATE to waste bananas that have gotten too ripe.

Here’s a handy tip for storing your bananas…I found it on Pinterest and it WORKS! To make your bananas last longer, separate the bunch into individual pieces of fruit. I promise…it really does prolong the shelf life of your bananas. The bananas in the photo below have been out for a week and are only starting to get a few brown spots. If I had left the bunch intact, it would have only taken a few days to get to this.  🙂

bananas

Back to the recipe! When you do find that despite your best efforts you have several very ripe bananas the best thing you can do is MAKE BANANA BREAD! 🙂

Preheat your oven to 350 F Degrees and grease a standard loaf pan.

What you will need:
3-4 very ripe bananas, peeled (other recipes call for less bananas, but I like my banana bread moist and full of banana flavor! 🙂
1/3 cup melted butter
3/4 cup of sugar (you can use as much as 1 cup or scale it down to a 1/2 cup depending on how sweet you want your bread to be.)
1 egg, beaten
1 teaspoon vanilla extract
1 teaspoon baking soda (not in my photo above…but be sure not to forget this important ingredient!)
Pinch of salt
1 1/2 cups of all-purpose flour
(Some recipes call for adding nuts, raisins, craisins, dates, etc. You can certainly add these to your recipe. In my house we’re banana bread purists, with the banana’s being the star! 🙂 )

Mash your banana. Add the melted butter, sugar, egg and vanilla and mix until blended. Add the baking soda and blend in. Sprinkle a  bit of salt in and finally add the flour and blend. Pour into your prepared loaf pan and bake for about an hour. (the time will depend on your oven so start checking the loaf at around 50 minutes. A knife inserted in the middle should come out clean and the top will be a nice rich dark brown – see below). Once I remove the bread from the oven, I cover it loosely with aluminum foil to keep the moisture in while it cools.

IMG_5904

Can you say YUM?! Enjoy! 🙂

FullSizeRender 2


Root Veggie Medley

I stopped eating meat about 6 months ago and I am always experimenting with new and interesting ways to prepare veggies. I was excited to find some beautiful purple sweet potatoes recently at our Fresh Market. And I also had some red potatoes and brussels sprouts on hand. There is nothing I love more than roasted veggies! I don’t know why I ever thought boiling them was a good idea! So the wheels started turning and I thought…mmmm…a medley!

IMG_5905 2.JPG

Preheat the oven to 350 F degrees.

You will need:
1 large baking sheet (with edges)
1 lb of Brussels Sprouts / sliced in half
1 Large Purple Sweet Potato / peeled and cubed
4-5 Red Potatoes / peeled and cubed
Extra Virgin Olive Oil
Garlic Powder (or if you have it real garlic) 🙂
Parsley Flakes
Red Pepper Flakes
Salt & Pepper
(You’ll notice I do not give you any measurements for the spices. I like things spicy. So I would say…season to taste!)
Butter for serving

Once you have sliced, peeled and cubed all the veggies put them in a large bowl with the spices and toss with enough olive oil to completely coat everything. Pour them onto the baking sheet and spread them out to form one layer. Doesn’t that look pretty! 🙂

IMG_5907

Bake until the potatoes are tender and the brussels sprouts are brown and caramelized. Serve with pats of melted butter.

FullSizeRender

It was hearty, spicy and filling…and I even have enough to pack for my lunch tomorrow! This kitchen experiment is definitely a keeper!


Magic Cake

I’ve been wanting to try this recipe for a while now. Of course the name is most intriguing. Magic. Anything MAGIC has to be good, right? So I assembled the ingredients and got to it.


IMG_5889

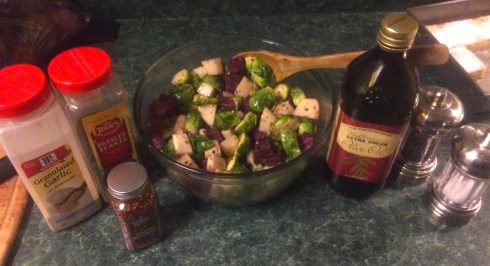
You’re going to need:

4 Eggs / Separated at Room Temp
3/4 cup of Sugar
1 tsp Vanilla
1 Stick or 1/2 cup of Butter / Melted
3/4 Cup of All Purpose Flour
2 Cups of Lukewarm Milk
Powdered Sugar for Dusting the Cooled Cake

8×8 inch baking pan (I only had a 9×9 inch pan, which made the cake height less than optimal for the cool layered affect, but it was still DELICIOUS!)
Mixer
Spatula
Several bowls for ingredients

Preheat the oven to 325 F degrees and grease the baking dish.

Start off by whipping the egg whites until they were stiff, and then set them aside. Next beat the egg yolks and sugar until light. Add the butter and vanilla, beating for a few more minutes. Add the flour and mix until incorporated and then add the milk and continue mixing until everything is well blended. Finally, gently fold the egg whites (1/3 of the batch at a time) until all the egg whites have been folded into the batter.

IMG_5890

Pour into the baking pan and bake for 40 minutes (you’ll need to figure out the time for your own oven. I have seen the baking time extended to 70 minutes). You’ll want to look for a light golden brown top to let you know it’s done.

Let the cake cool completely and dust with powdered sugar before serving. The “Magic” is in the way that the cake appears to have a crust layer, a custard-like layer and a cake top layer. (As I had mentioned earlier, if I had used a smaller pan the layers for my cake would no doubt have been much more dramatic.) But the taste was delightful. It had a vanilla custard  flavor and each slice was the consistency of a brownie. It would be a very nice recipe for a pot luck or perfect for packing in a to-go lunch or picnic. There are variations in other flavors like lemon and chocolate. I will definitely want to try those.

IMG_5902

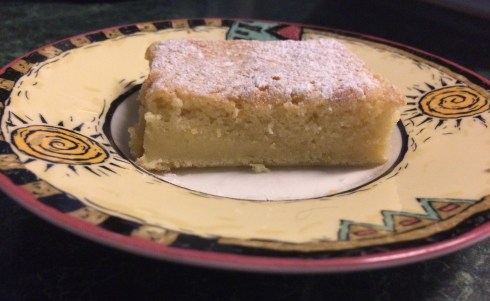
The anticipation was definitely worth the wait!

I found this particular recipe on Jo Cooks at www.jocooks.com/bakery/cakes/magic-cake/. There are a lot of variations out there but I liked her list of ingredients the best.